About Gapp
Gapp White Label: The mobility solution for your GLPI
Exploring Gapp
Essentially, Gapp is a GLPI-based mobile application.
Gapp has evolved significantly as a solution for convenient mobile access to GLPI, particularly for self-service users.
It has proved critical for technicians who are frequently away from their desks. Its unique features, some not found in the standard GLPI, and its portability make it an exceptional resource for technical staff and a powerful tool for real-time data collection for management.
What’s the difference between Gapp Self-Service & White Label?
Gapp Self-Service: A free, ready-to-download mobile app for standard GLPI use, ideal for smaller organizations or everyday usage needs.
Gapp White Label: An Xtended, customizable mobile app tailored to an organization’s specific GLPI management needs and branding, suited for larger organizations or more complex usage scenarios.
Gapp White Label Setup
Configuring your Gapp White Label variant is straightforward and consistently supported by TICGAL’s experts. In contrast to Gapp Self-Service, you only need to set up the GLPI Backend, as the applications are ready to use straight out of the box!
- Server Side Configuration.
-
- Enable API: Configure your server to enable the GLPI API (Application Programming Interface). The GLPI API is a set of rules that allows Gapp to communicate with the GLPI (Gestionnaire Libre de Parc Informatique) system. Enabling the GLPI API establishes a secure and standardized channel for data exchange between the server and the Gapp application. We have written a specific how-to regarding this issue. Please click on it and follow the instructions: How to set up GLPI API.
- Install and configure Gapp Xtended: TICGAL should have made the plugin available or installed it upon request. Initial parameters have been set up. If not, install it as any other plugin and follow the KB article on TICGAL’s Service Desk.
Once GLPI and Gapp Xtended are properly configured, you must download your particular flavor from the Play Store or App Store.
USER MANUAL
Login & Settings
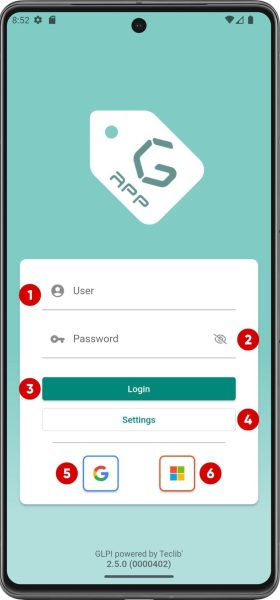
Login
The login for your app is customized according to the preferences of the app owner. Various authentication methods can be made available, depending on their requirements.
- User. This field prompts users to enter their account’s unique username or email address.
- Password. The password field is where users input their confidential password.
- Submit button. Users must press this button after entering their username and password.
- Settings. This option allows users to modify their account and application settings.
- Sign in with Google.
- Sign in with Microsoft 365.
Note: Sign-in with AppleID is supported on demand and only on Apple Devices.
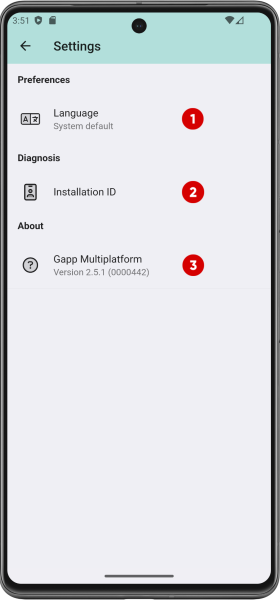
Settings (Not logged)
In the Settings section of our application, a set of fundamental options is displayed to personalize the user experience.
- Language. Here you can change the language in which the application is shown.
- Installation ID. The Installation ID is a unique identifier for the app instance installed on a user’s device. It can be useful for troubleshooting or support purposes.
- Gapp Version. You can see more information by clicking on it.
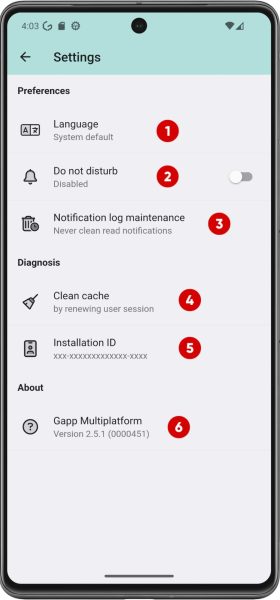
Settings (Logged)
If the user is authenticated, more options will be displayed in the Settings section.
- Language.
- Do not disturb. Enabling this feature will suppress app notifications, ensuring uninterrupted focus during specific activities.
- Notification log maintenance. This new button allows you to delete the notification history from time to time. When you press it, a pop-up window will be displayed in which you must indicate the interval.
- Clean cache. This function renews the user session. It is useful to apply changes without having to log in again in case of changing profiles or entities.
- Installation ID.
- Gapp Version.
Note: Go back to the previous screen by clicking on the top left arrow.
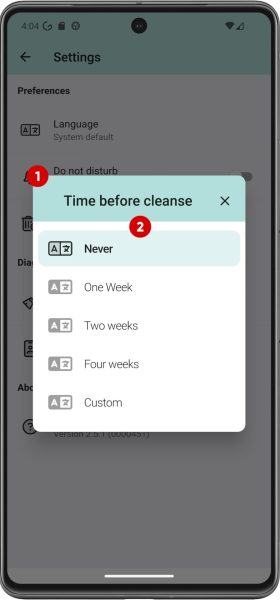
Settings (Interval to delete notification logs)
This pop-up shows several intervals. If none suits the user’s needs, a custom one can be added
- Set interval to clean logs pop-up.
- Interval options list.
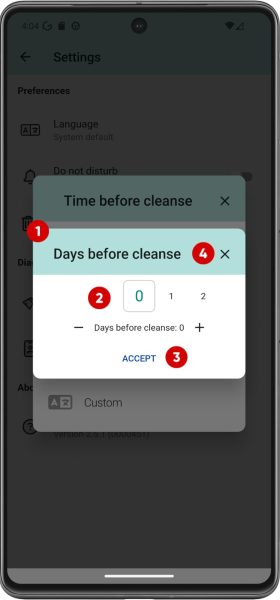
Settings (Custom interval to delete notification logs)
This pop-up shows several intervals. If none suits the user’s needs, a custom one can be added
- Set custom interval to clean logs pop-up.
- Input for interval (in days).
- Accept and confirm button.
- Cancel button.
Home & Main menu
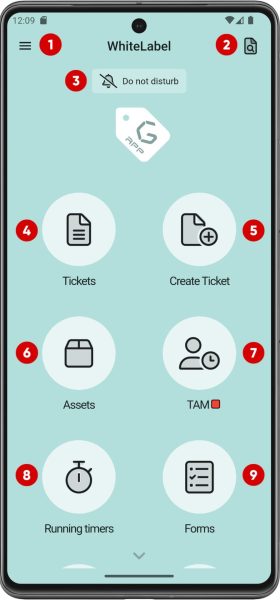
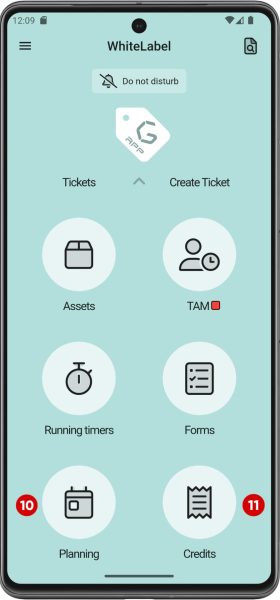
Home
This is the home screen in Gapp. Let’s explore the features integrated into this interface:
- Menu with access to more features of the application.
- Search and access a ticket by ID.
- Do not disturb. This feature allows you to temporarily silence notifications, ensuring uninterrupted focus when needed.
- Tickets. Easily navigate through all tickets assigned to the logged-in user. This section provides a quick overview of your current workload.
- Create ticket. This button allows users to initiate the ticket creation from the home screen.
- Assets. You can quickly access your assets and open issues on them if you need to use the QR reader. This button also shows all the user’s assets in a dropdown without the need to scan QR codes.
- TAM. The TAM plugin controls the attendance, vacations, and leave of your employees.
- Running timers. This feature keeps track of the time spent on your ticket tasks.
- Forms. Forms use the Formcreator plugin that allows the creation of custom forms for easy access.
- Planning provides users with a clear view of their daily or weekly schedules, allowing for effective time management and task organization.
- Credits. This feature assigns credits to tasks, responses, and follow-ups. Ideal for managing hour bonuses, credits are subtracted based on the actual time spent on tasks.
Note: You will only be able to access these functions if you have the Gapp White Label version and the respective plugins: TAM, Forms, Running, Timers and Credits.
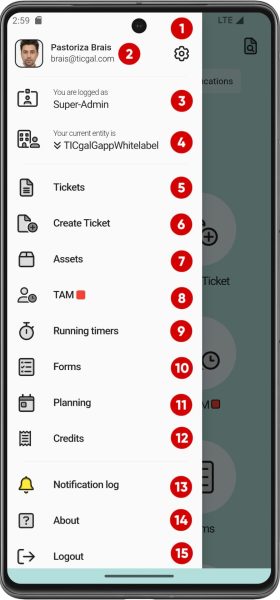
Main menu
This menu allows access to several of the functions discussed in the previous section, but also others:
- Settings button.
- User.
- Current profile. This will not be enabled for a one-authorization user.
- Current entity. This will not be enabled for a one-authorization user.
- Assigned tickets.
- Create a new ticket.
- Assets.
- TAM.
- Running timers.
- Forms.
- Planning.
- Credits.
- Notification log.
- About. App version, links, and contact. The usual stuff.
- Logout button.
Note: You will only be able to access these functions if you have the Gapp White Label version and the respective plugins: TAM, Forms, Running, Timers and Credits.
Ticket creation
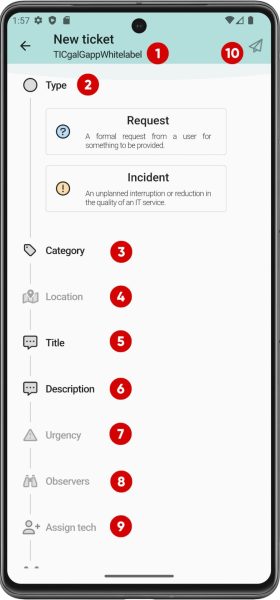
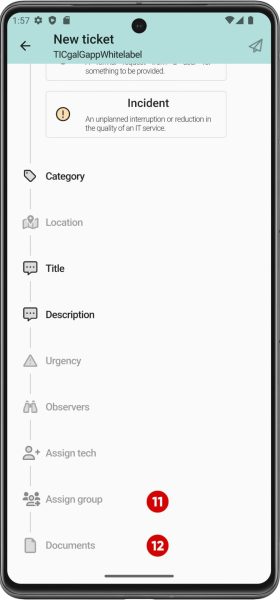
New ticket
This screen will appear if you click on a new ticket from the home screen, the main menu, or the yellow (+) icon in the main ticket view.
- The entity where you are creating the ticket.
- Ticket type. Request or Incident.
- Category of the ticket.
- Location of the request/incident (optional).
- Title of the ticket.
- Description of the ticket.
- Urgency of the ticket.
- Observers.
- Assign tech.
- Create ticket. Press this button to create the ticket.
- Assign group.
- Documents upload. You can choose from your local files or take photos with your phone’s camera (optional).
Note: In the Gapp White Label version, exclusive features include the ability to assign a technician or group, enhancing task allocation efficiency. Additionally, this release allows users to configure optional fields as mandatory through the GLPI backend for a more tailored and structured ticket creation process.
Ticket list
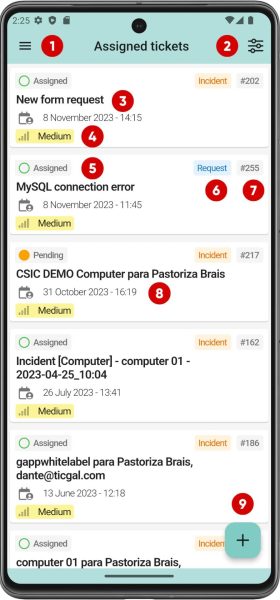
Main tickets view
This is the ticket window in Gapp.
- On the top left is the burger menu icon.
- On the top right is the filter menu.
- Now, on each card, we have on top the ticket title.
- In the bottom left of each ticket, we have a small icon telling us the ticket priority.
- In the top left of each ticket, we have a ticket status indicator. Just like GLPI:
- New
- Processing (Assigned)
- Processing (Planned)
- Waiting
- Solved
- Closed
- In the top right of each ticket, we have an indicator of the ticket type:
- Incident
- Request
- Also in the top right of each ticket, next to the ticket type, we have the ticket number.
- Just below the ticket title appears the ticket’s last update.
- Finally, there is a New ticket button.
Note: All tickets are sorted using the last update from newer to older.
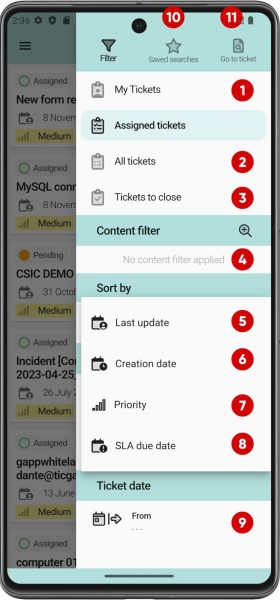
Filters menu
With access to the Filter Menu, the following screen is shown.
- Your opened tickets (My tickets).
- You can reach all tickets based on your permissions (All tickets).
- Your solved tickets pending to close (Tickets to close).
- The content filter allows you to make a text-based fast search on the ticket title or description.
- Sort tickets by last update.
- Sort tickets by creation date.
- Sort tickets by priority.
- Sort tickets by the SLE due date.
- Show tickets created from a date.
- This button allows you to use custom searches for tickets, which must be previously configured (tickets from a group or in a specific state, for example).
- From here you can also directly access a ticket by its ID.
Ticket view
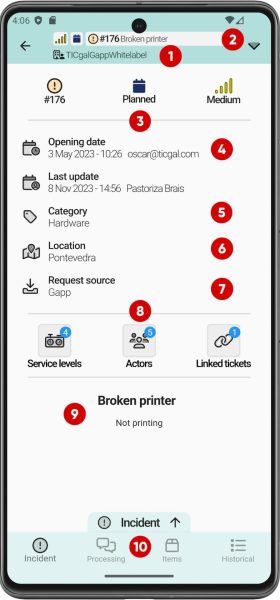
Main ticket view
This section displays a summary of the ticket.
- The entity where the ticket is located.
- A toolbar that allows users to change ticket status and category.
- Three small icons show:
- Number of the ticket and if it is an Incident(!) or a Request(?).
- Ticket status.
- Ticket priority.
- Dates related to the ticket. The creation date and the last update date.
- Category of the ticket.
- Location of the ticket. If a location has the coordinates saved in GLPI, it will appear highlighted in a different color in the app and when you click it will open your navigation application with the coordinates. The navigation applications currently supported are the following:
- Google Maps
- Apple Maps (iOS only)
- Google Maps GO (Android only)
- Baidu Maps
- Amap (Gaode Maps)
- Waze
- Yandex Maps
- Yandex Navigator
- Citymapper
- Maps.me (iOS only)
- OsmAnd
- OsmAnd+ (Android only)
- 2GIS
- Tencent (QQ Maps)
- HERE WeGo
- Petal Maps (Android only)
- TomTom Go
- TomTom Go Fleet
- CoPilot
- Flitsmeister (Android only)
- Truckmeister (Android only)
- Sygic Truck
- Naver Map
- KakaoMap
- TMAP
- Mapy.cz
- Ticket requesting source.
- Icons where you can find and modify (only actors) the following information about the ticket:
- Service levels.
- Actors (users or groups).
- Other tickets are linked to this ticket.
- Title and description of the ticket.
- Ticket view selector.
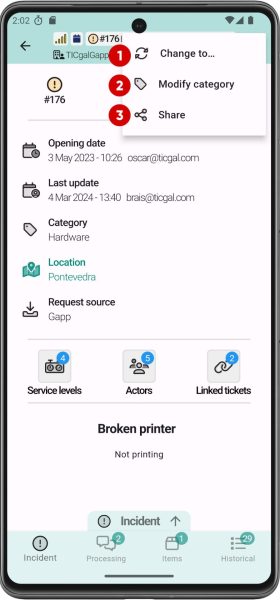
Main ticket view – Toolbar
- Change ticket status button.
- Modify ticket category button.
- Share ticket button.
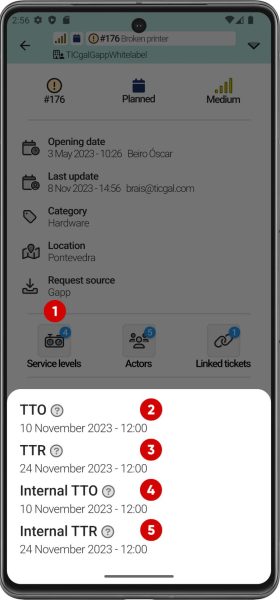
Service Levels
Here you can see the ticket’s Service Levels.
- The button you have to click on “Ticket View” to see the Service Levels.
- TTO (Time to own).
- TTR (Time to resolve).
- Internal TTO (Internal time to own).
- Internal TTR (Internal time to resolve).
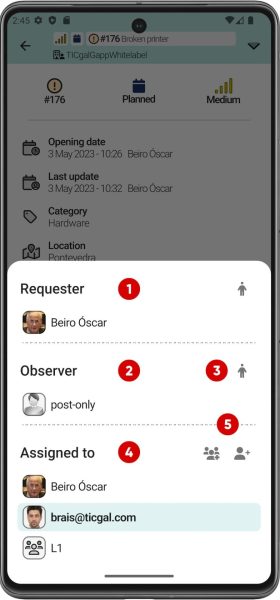
Actors
Here you can see and modify the ticket’s actors.
- Ticket’s Requesters.
- Ticket’s Observers.
- Add yourself as an observer.
- Ticket’s Assigned Technicians.
- Add other users, groups, or yourself as an assignee.
Note: In Gapp White Label you also can remove added users/groups by clicking on them.
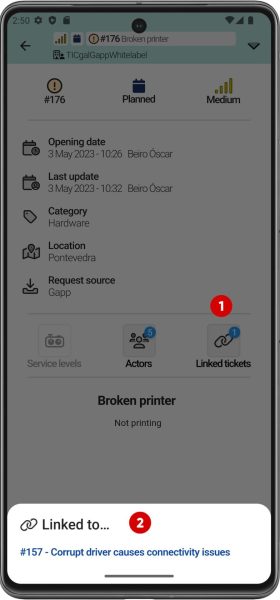
Linked tickets
Here you can see and access the ticket’s linked tickets.
- The button you have to click in to see the Linked Tickets.
- List of the linked tickets.
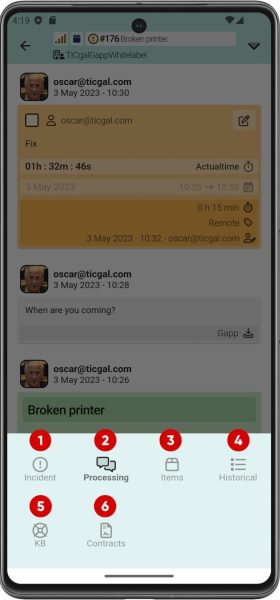
Ticket view selector
- Request / Incident – Main view.
- Processing – Conversation view.
- Assets –Linked assets.
- Historical view of the ticket.
- KB – Knowledge base
- Contracts.
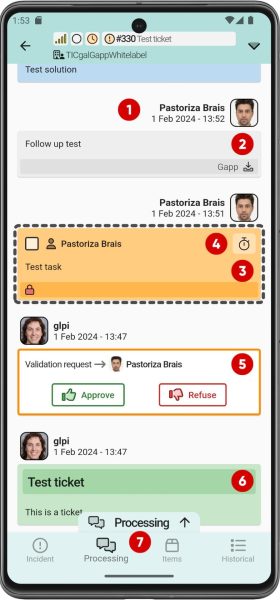
Processing
You can find the following elements on a ticket.
- In every task, follow-up, or solution, you will see first the following information:
- Profile picture.
- Creator.
- Date.
- In a followup you will see:
- Follow-up description.
- Private lock (if the follow-up is private).
- In a task you will see:
- A small icon that tells you if the task is done or not.
- The Task Assigned Tech.
- Task description.
- Private lock (if the task is private).
- Actualtime functions (An additional plugin is needed).
- In a validation request you will see the following:
- The user asked for the validation.
- Main ticket information:
- Title of the ticket.
- Description of the ticket.
- Ticket actions. This button allows you to change the ticket status or category.
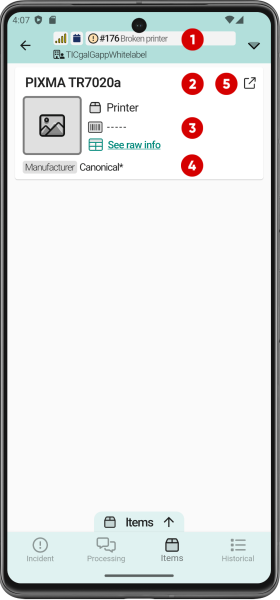
Items (I)
You can find all the items linked to a ticket.
- Ticket information.
- Item name.
- Item information.
- Item manufacturer. In this section, more or fewer details will be shown depending on the item (model, type…).
- Link to see more details and options of the item.
Items (II)
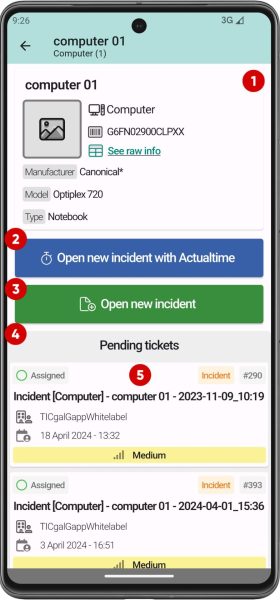
This screen shows more options, some of them not available without the corresponding plugins.
- Ticket information.
- Open new incident with Actualtime (requires Actualtime plugin).
- Open new incident without Actualtime.
- List of pending tickets associated with the item.
- Pending ticket.

Item raw info
From the list of items in the ticket view, the raw information of the item can be accessed by clicking on “See raw info” in the menu shown above.
- Item name.
- Item raw information.
Historical
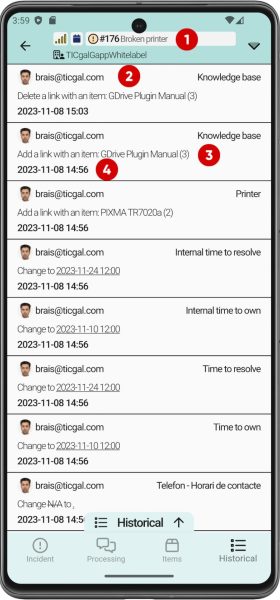
This is a function only available in Gapp White Label.
- Ticket information.
- The user who made the change/update.
- Description of change/update.
- Date of change/update.
Ticket actions
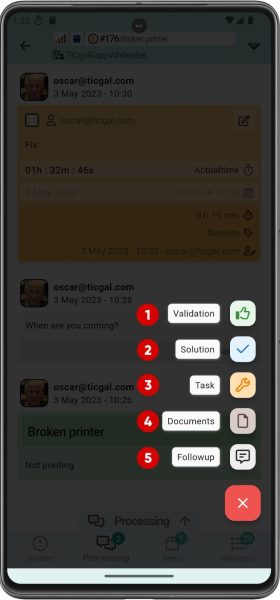
If you push the button in the bottom-right in the Ticket Process view you will see.
- Add a new validation.
- Add a new solution.
- Add a new task.
- Add a new document.
- Add a new followup.
Note: This represents the essential functionality of the application and is also available in Gapp Self-service. If you are a technician, you will have access to all of these features. For self-service users, the button will directly open the “New followup” tab.
Add a task
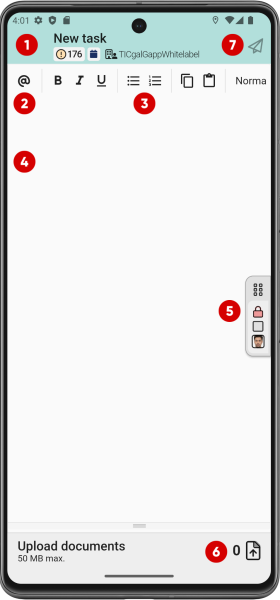
- Ticket information.
- Mention another tech.
- Formatting options for task description.
- Task description.
- Properties. You can choose to send a private task if logged as a technician. Also, you can set the task status, and category, and mark it as pending or done.
- Documents upload area. You can see a counter of uploaded documents. You can also upload photos directly from your smartphone camera in addition to your local files.
- Create task.
Note: You can only mention another tech if you have the Gapp White Label version.
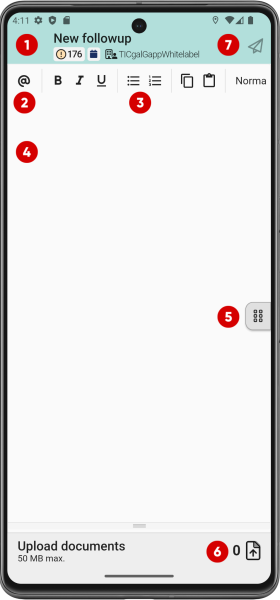
Add a followup
- Ticket information.
- Mention another user.
- Formatting options for follow-up content.
- Follow-up content.
- Properties. You can choose to send a private follow-up or set the ticket to pending if logged as a technician.
- Documents upload area. You can see a counter of uploaded documents. You can also upload photos directly from your smartphone camera in addition to your local files.
- Send a follow-up.
Note: You can only mention another user if you have the Gapp White Label version.
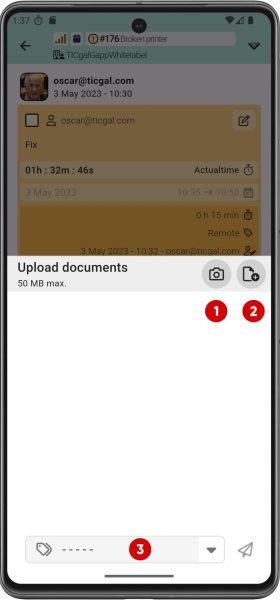
Add a document (I)
The application allows you to attach images taken with the phone’s camera or files already existing on the device.
1. Open the camera.
2. Select a file that already exists on the device.
3. Selected headings.
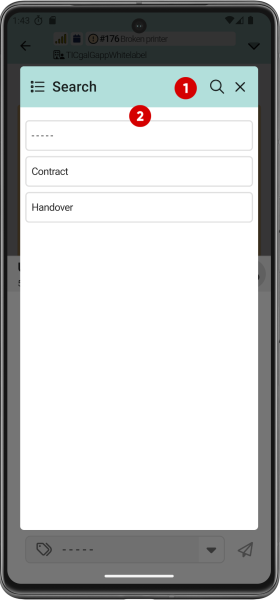
Add a document (II)
When the file to be attached to the ticket has already been indicated, the header can be indicated by selecting it from the following drop-down menu.
1. Search window.
2. List of available headings.
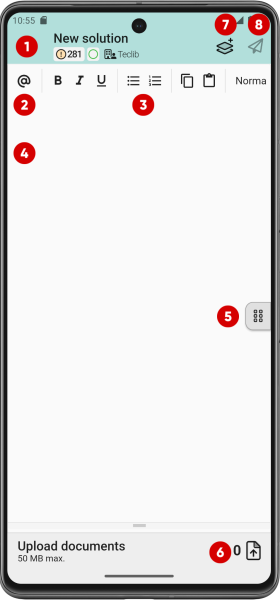
Add a solution
- Ticket information.
- Mention another user.
- Formatting options for solution content.
- Solution type.
- Properties of the solution.
- Documents upload area. You can see a counter of uploaded documents. You can also upload photos directly from your smartphone camera in addition to your local files.
- Use and solution template.
- Add ticket solution.
Note: You can only access the following functions if you have the Gapp White Label version: mention a user and use solution templates.
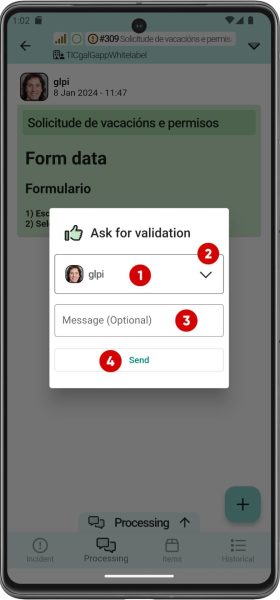
Ask for validation
This is a function only available in Gapp White Label.
- The selected user will be asked for validation.
- Dropdown for selecting a user.
- Validation message (Optional).
- Send validation.
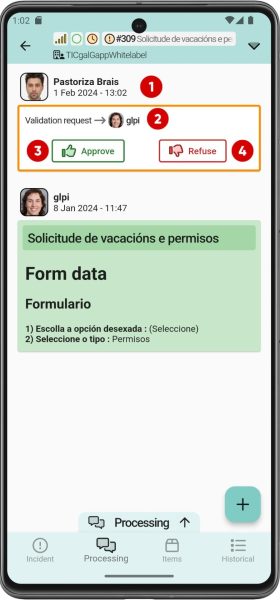
Ticket approval (I)
When you create an approval request, you will see in the ticket processing view:
- Validation requester.
- User or group you are requesting the approval from.
- Approve validation button.
- Refuse the validation button.
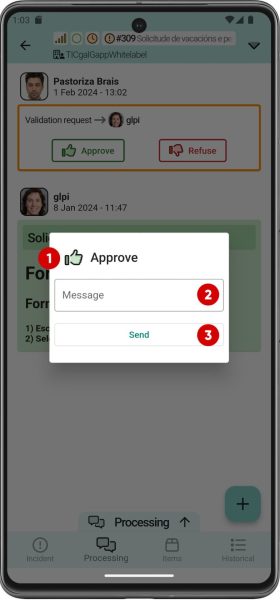
Ticket approval (II)
Whether you approve or refuse a validation, this menu will pop up.
- The icon shows whether you are making an approval or a rejection.
- Message of the approval or rejection. If you approve a validation request, the message is optional, but in a rejection, it is mandatory.
- Send approval or rejection button.
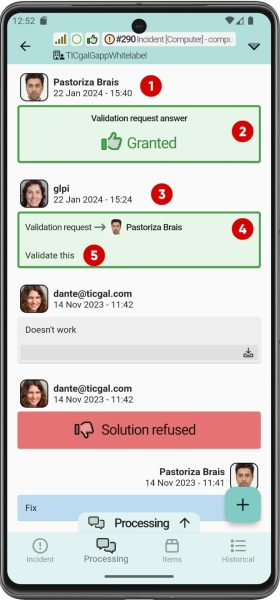
Ticket approval (III)
After you approve or reject a validation, the processing view will look like this.
- The user who approved or rejected the validation request.
- Answer to the validation request.
- Validation requester.
- User or group you are requesting the approval from.
- Approval description.
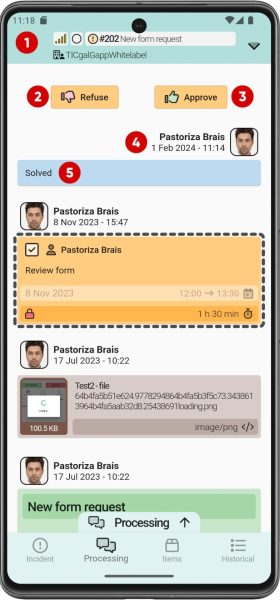
Solution approval
- Ticket information.
- Refuse solution.
- Approve solution.
- Solution tech and date.
- Solution description.
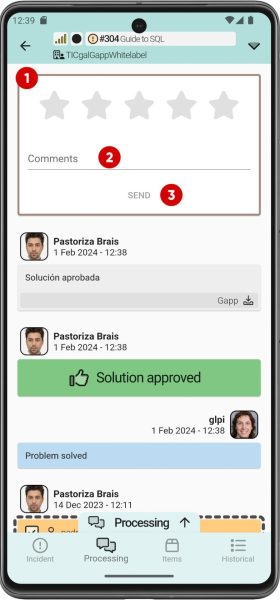
Ticket satisfaction
When a solution is approved, it will pop up.
- Rating of the ticket solution (1 to 5 stars).
- Comments about the satisfaction.
- Send the satisfaction survey.
Changes
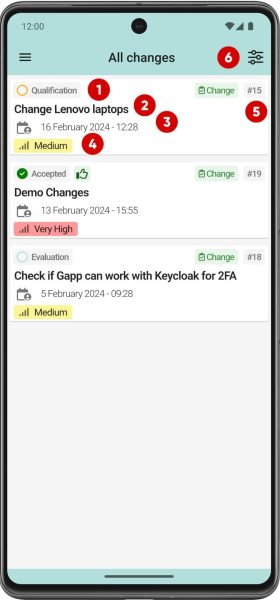
Changes list
All changes are shown in this view, although various filters can be applied.
- Change status.
- Change title.
- Change date.
- Change priority.
- Change ID.
- Change filter.
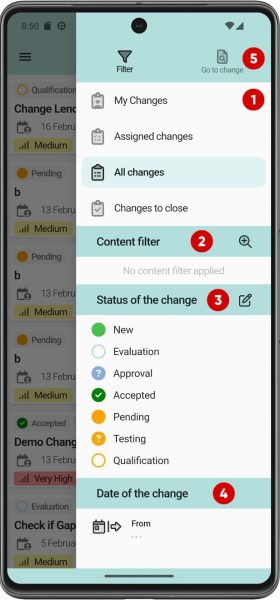
Filter changes
With filters, users can select and display changes based on a variety of attributes: content, status, date…
- Default filters.
- Filter by content.
- Filter by status.
- FIlter by date.
- Go to change link (by id).
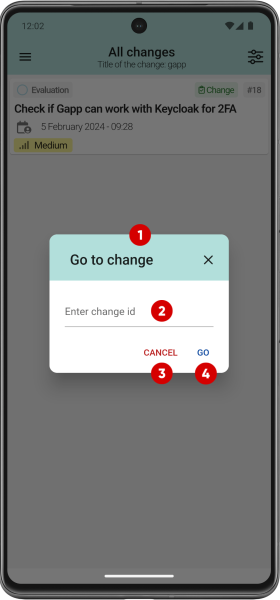
Go to change
By clicking on the Go to change button you can access a change by entering the ID.
- Go to change pop-up.
- Change ID input.
- Cancel button.
- Go to change button.
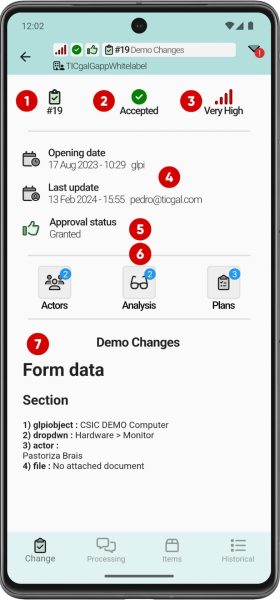
Main change view
This is the main view of a change, which is subdivided into 3 others: actors, analysis and plans.
- Change ID.
- Change status.
- Change priority.
- Change opening date and last update.
- Change status.
- Change views.
- Change summary.
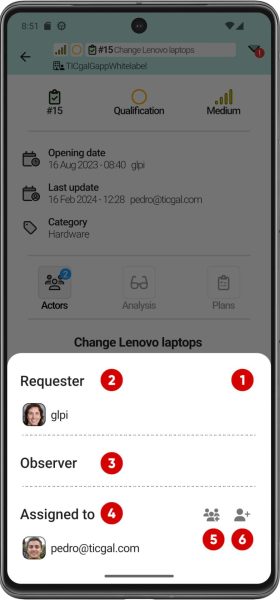
Change actors
The change actors section in GLPI identifies and defines the roles and responsibilities of the people involved in the change process. This can include users or groups.
- Actors view.
- Requester.
- Observer/s.
- Assigned user/group.
- Assign group.
- Assign user.
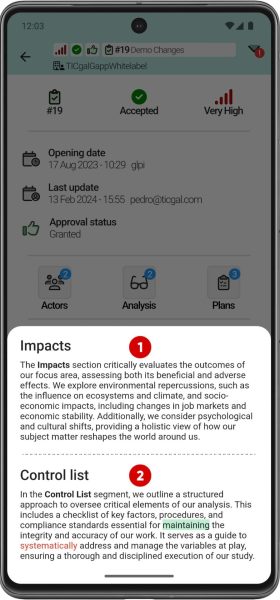
Change analysis
The GLPI change analysis section provides a detailed evaluation of the effects and consequences of the proposed change. It includes two main components:
- Impact. This part of the analysis examines both the positive and negative outcomes of the change, considering how it will affect different areas of the system and users.
- Checklist. Describes a structured approach to monitoring critical elements of change. This includes a checklist of key factors that must be considered to ensure successful implementation of the change.
Change plans
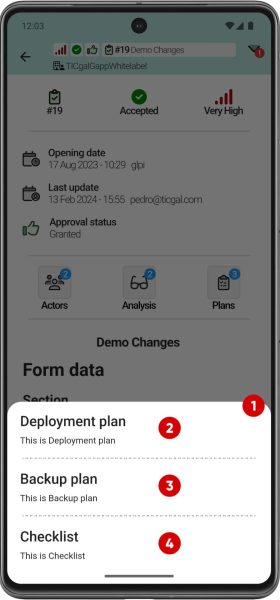
This plan contains deployment plans, backup plans and check-listsGLPI change plans are detailed documents that contain essential information to implement changes effectively and safely. They include a deployment plan with specific steps, a backup plan to protect data, and a checklist to ensure all necessary tasks are completed.
- Plans list.
- Deployment plan.
- Backup plan.
- Checklist.
Change status
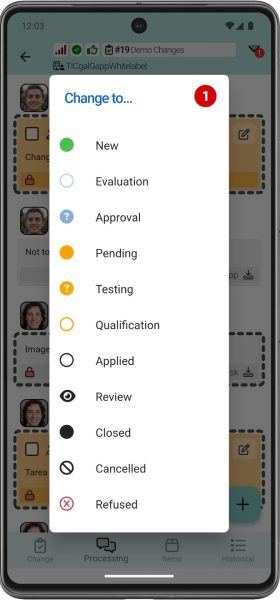
The states section of a change refers to the different states that a change can have throughout its life cycle. These statuses indicate what stage the change is in and what actions may be required next.
- Choose a new change status pop-up.
Notifications
Push notifications
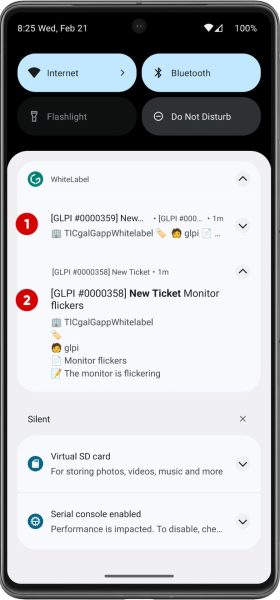
Some notifications are displayed outside the app (new incident, request, follow-up…).
- Notification not displayed.
- Notification displayed.
New notifications (I)
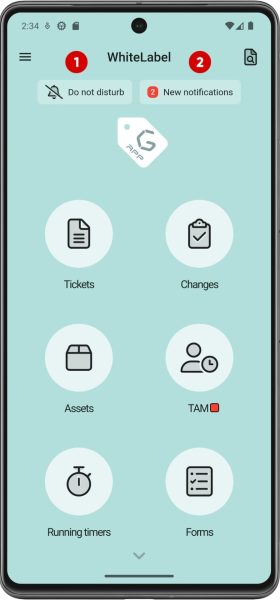
Clicking the link in the main view of the application will display the notifications that the user received while Do not disturb mode was activated.
- Do not disturb icon (if activated).
- New notifications link.
Note: If this mode is not activated, notifications will be displayed and added to the notification history automatically.

New notifications (II)
Users can review or delete notifications from here.
- New notifications view.
- Left swipe to delete notification.
- Notification.
Note: Deleting a notification will also delete other notifications associated with the same ticket from this section.
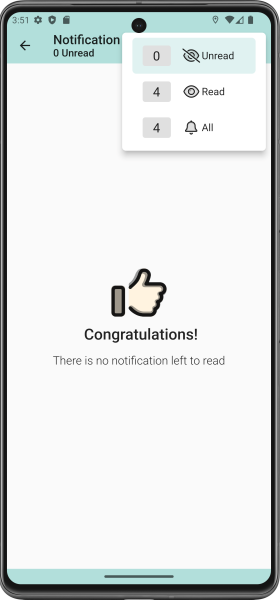
Notifications log (I)
All notifications are stored in the notification history. You can show those that have not been read, those that have been read, or all of them together.
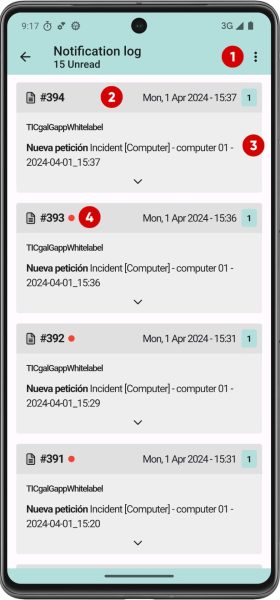
Notifications log (II)
Notifications are displayed in a list.
- Option menu.
- Notification ID.
- Notification content.
- Red dot to indicate that the notification is also in the Do Not Disturb list.
Alerts
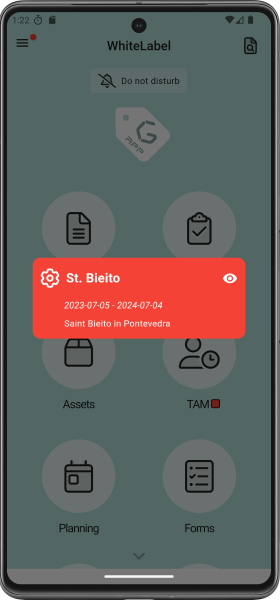
Alerts
If you have the Alerts plugin installed on the GLPI server, the application will display the alerts that have been configured when appropriate.
Upload images
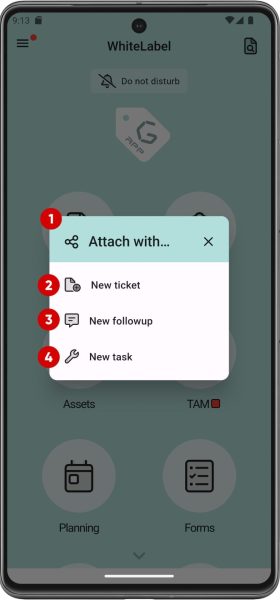
Upload image
It is now possible to select images from the gallery and add them directly to a request, task or follow-up.
- Add image popup.
- Add image to a ticket.
- Add image to a task.
- Add image to a followup.
Planning
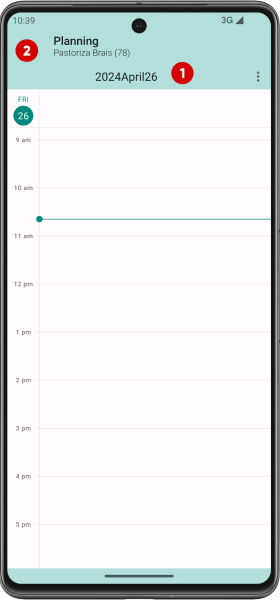
Planning view
Planning allows you to quickly view calendar tasks.
- Date
- Planning with tasks for the selected day, week or month.
New widget
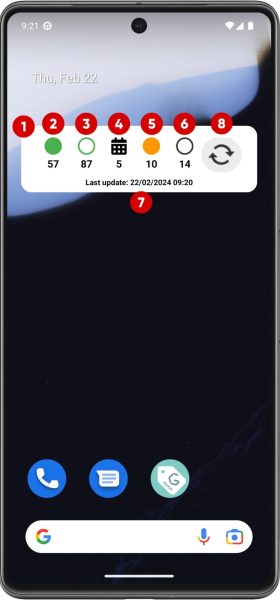
Summary widget
The new version adds a widget that shows a summary of tickets without having to open the application.
- Widget.
- Number of new tickets.
- Number of assigned tickets.
- Number of planned tickets.
- Number of waiting tickets.
- Number of closed tickets.
- Widget last update.
- Update widget.
Note: This feature is available only on Android.
Update available popup
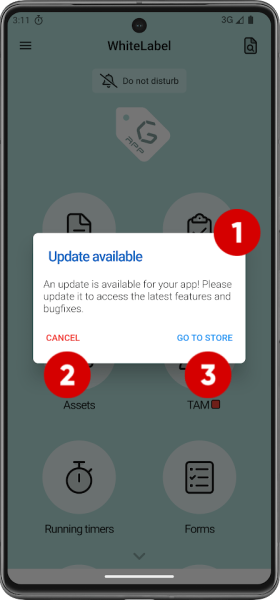
Update available
When a new version of the application is available, the user is notified to access the Store and update it.
- Pop-up.
- Cancel button.
- Go to store and update link.


