

About Gapp
Gapp: The mobility solution for your GLPI
What is Gapp?
Gapp is a mobile application designed to transform the way organizations interact with their users in today’s rapidly evolving digital environment. Focusing on integrated self-service solutions, Gapp provides users with intuitive features to streamline processes and increase productivity.
Gapp Versions
- Gapp Self-Service. This is a complimentary mobile application, readily downloadable for standard GLPI utilization, catering ideally to smaller organizations or daily operational requirements.
- Gapp White Label. Gapp White Label offers an extended, customizable mobile application specifically designed to accommodate an organization’s GLPI management requisites and branding. Tailored for larger entities or intricate usage scenarios, it ensures a seamless fit for diverse organizational needs.
Gapp Self-Service Configuration
Configuring Gapp Self-Service is a straightforward process that involves just two steps:
- Server-side Configuration. Begin by enabling the API support on your GLPI server. Detailed instructions on how to accomplish this can be found in our dedicated guide: How to set up GLPI API.
- Client-side Configuration. After configuring GLPI, proceed to download Gapp Self-Service from Google Play Store. Upon installation, input your server configuration details into the app.
With these two steps completed, your Gapp Self-Service will be fully configured and ready to optimize your workflow seamlessly.
Gapp Self-Service Screens
1. Login & Settings.
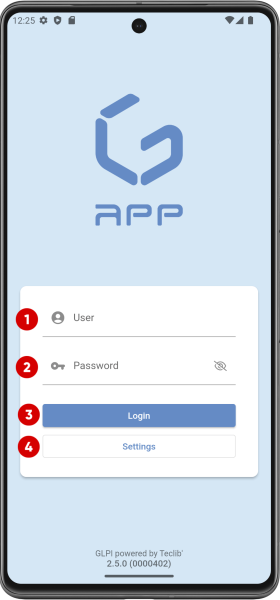
Login
Enter your credentials to start taking advantage of all the features of the application.
- User input.
- Password input.
- Login button.
- Settings button.
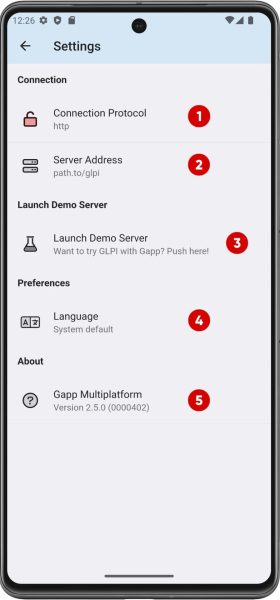
Settings
In this section, you can personalize your Gapp Self-Service experience according to your individual preferences.
- Connection Protocol.
- Server Address.
- Launch Demo Server.
- Language.
- Gapp Multiplatform. This section shows the installed version of the application.
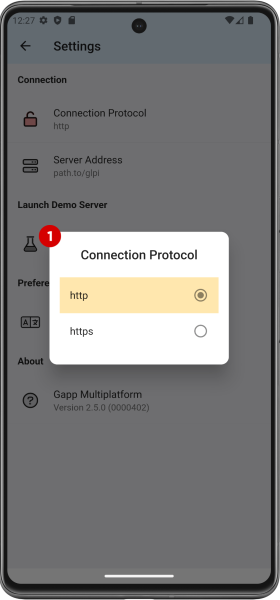
Settings – Connection Protocol
Choose your server’s protocol: http or https (recommended).
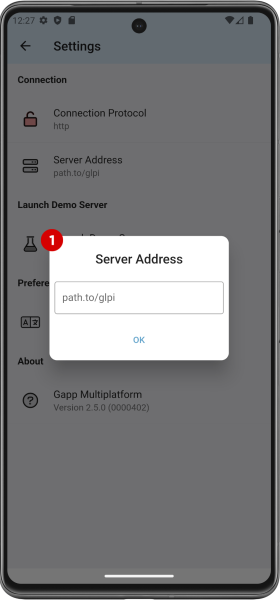
Settings – Server Address
Add your server URL or IP. If your GLPI is not on the root web folder, please add it here.
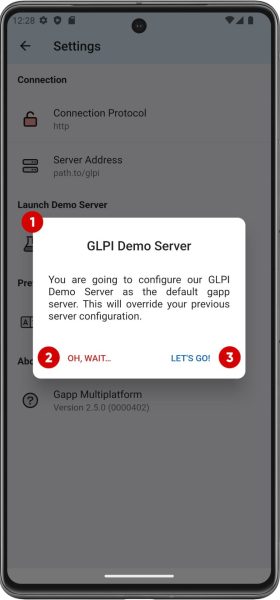
Settings – Launch Demo Server
For you to test Gapp without further setup, push on this setting. It will auto-setup and auto-login as a tech to our demo server. Please, bear in mind data added to this server will be reset periodically.
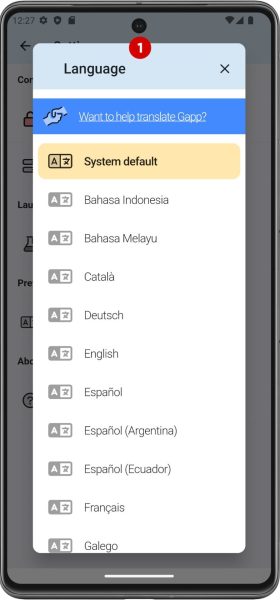
Settings – Language
Here you can change the language in which the application is shown.
2. Home & Drawer Menu.
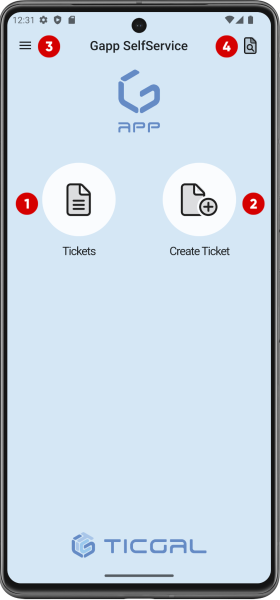
Home
This is the new home screen in Gapp.
- Show tickets. Quick access to all tickets. You can use filters to refine ticket searches.
- New ticket button. This button will allow you to create a new ticket from the home screen.
- Drawer menu. More options are displayed here.
- Go to ticket button. If you click it will display a smaller window where you can write a ticket number to go to it in a fast way.
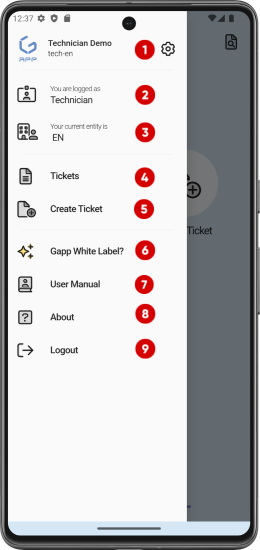
Drawer Menu
- Logged user.
- User current profile.
- User current entity.
- All tickets where logged user is assigned to.
- You can also create a new ticket from here.
- Gapp White Label? Link to the manual for the Whitelabel version of the application.
- User manual. Link to the manual for the Self-Service version of the application.
- About. App version, links and contact.
- Logout button.
Note: Current entity and profile will not be seen enabled for a one authorization user.
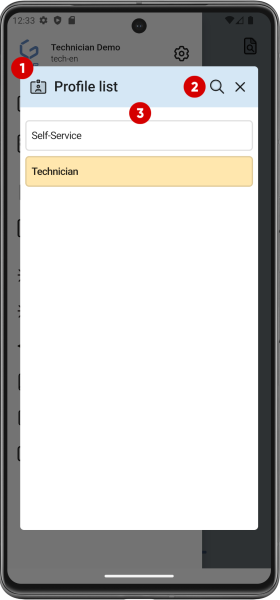
Drawer Menu – Profile
If the user has multiple profiles assigned, they will be displayed on this screen and they can use each one when needed.
- Profiles view.
- Search profile button.
- Profile list.
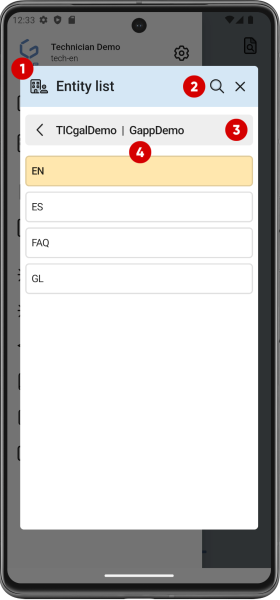
Drawer Menu – Entity
The user can also change entities when needed, as long as they have permissions on that entity.
- Entities view.
- Search entity button.
- Entity list.
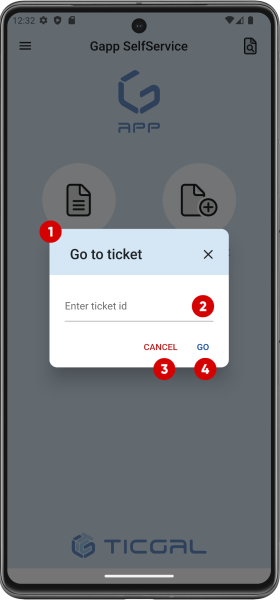
Go to ticket
Enter a ticket ID to access it quickly.
- Go to ticket popup.
- Ticket ID input.
- Cancel button.
- Confirm button.
3. Tickets view.
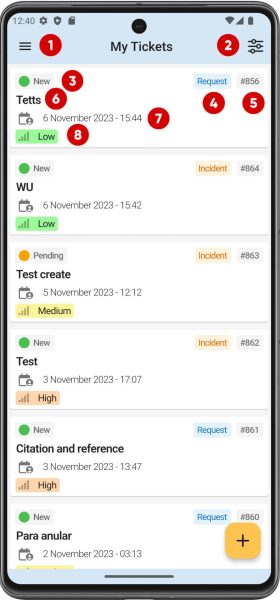
Main Tickets view
By default three lists are displayed:
- All tickets. All tickets that you may be able to reach based on your permissions
- My tickets. Your opened tickets.
- Tickets to close. Your solved tickets pending approval of your solution.
Any of these three lists show the following:
- Drawer menu link.
- Filter menu link.
- Ticket status.
- Ticket type (incident or request).
- Ticket ID.
- Ticket title.
- Ticket date.
- Ticket priority.
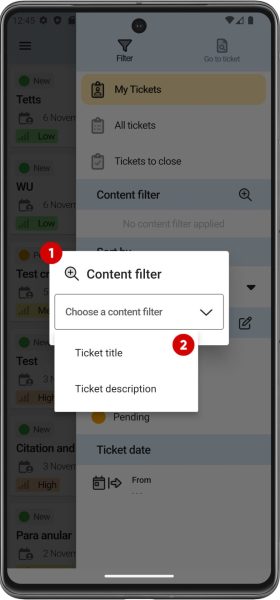
Tickets Content Filter
In addition to the default filters, a content filter allows you to make a text-based fast search on the ticket title or description.
- Content filter popup.
- Filtering options.
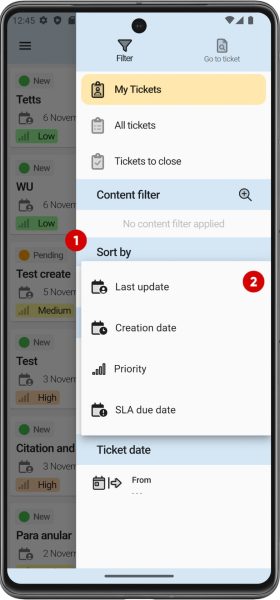
Tickets – Sort By
If the user needs to sort the tickets in some way, the following criteria are offered: creation date, last update, priority and SLA due date.
- Sort by popup.
- Criteria list.
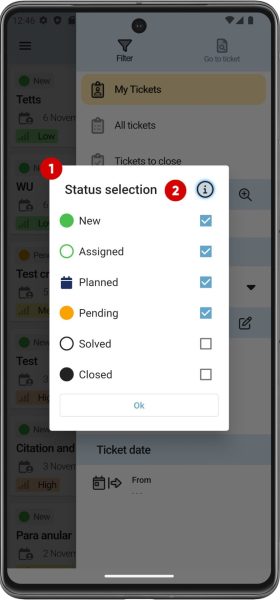
Tickets Status Filter
Tickets can also be filtered by their status.
- Status filter popup.
- Status list.
4. Ticket view.
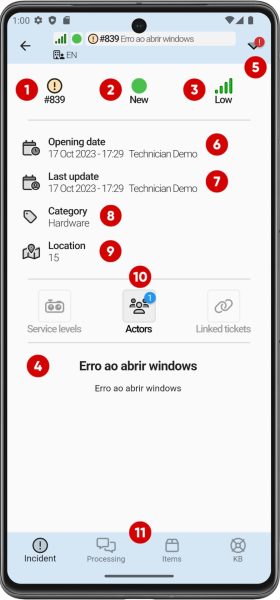
Ticket view
This is how you will see a ticket on Gapp:
- Ticket ID and type (incident or request).
- Ticket status.
- Ticket priority.
- Ticket content.
- Toolbar.
- Creation date.
- Last update date.
- Ticket category.
- Ticket location.
- Ticket info.
- Service levels
- Actors (users or groups)
- Linked tickets
- Ticket view selector:
- Incident / Request – This view.
- Processing – Conversation view.
- Items – Linked assets.
- Knowledge base (KB) – Technical manuals on procedures necessary to resolve the ticket.
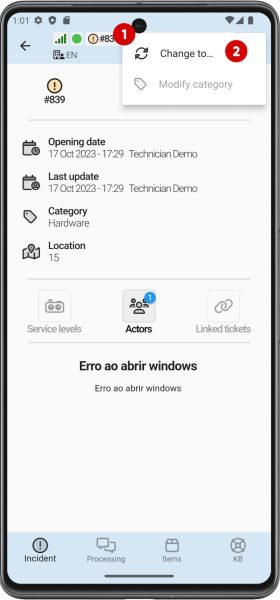
Ticket View – Incident – Toolbar
The ticket toolbar allows you to change its status.
- Ticket toolbar.
- Change status button.
Note: The user will only be able to modify the category if the ticket is resolved and they have the necessary permissions.
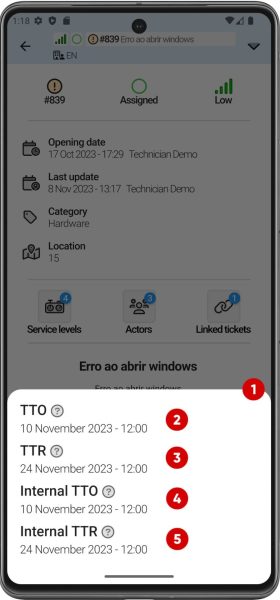
Ticket View – Incident – Service Levels
Here you can see the ticket’s Service Levels.
- Ticket service levels view.
- TTO (Time to own).
- TTR (Time to resolve).
- Internal TTO (Internal time to own).
- Internal TTR (Internal time to resolve).
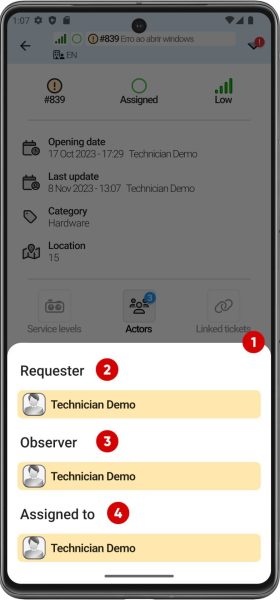
Ticket View – Incident – Actors
Here you can see the ticket’s actors.
- Ticket actors view.
- Ticket’s Requesters.
- Ticket’s Observers.
- Ticket’s Assigned Technicians.
Note: In Gapp White Label you also can remove added users/group by clicking on them.
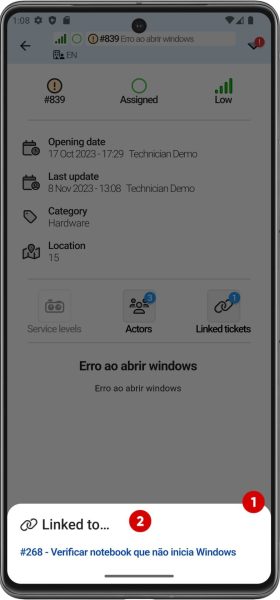
Ticket View – Incident – Linked tickets
Here you can see the ticket’s linked tickets.
- Linked Tickets view.
- Linked tickets list.
Ticket View – Processing
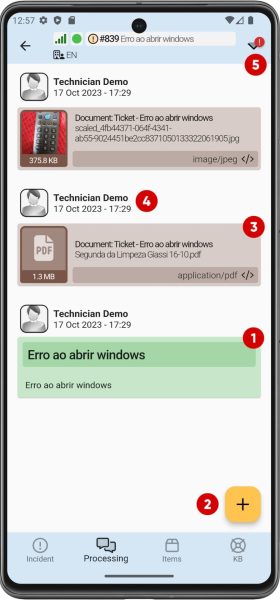
Like in a full-fledged GLPI you can find all the elements on a ticket.
- Ticket title and description.
- Ticket actions button.
- Task / followup / file uploaded content.
- Task / followup / file uploaded creator and date.
- Ticket toolbar.
Ticket View – Processing – Toolbar
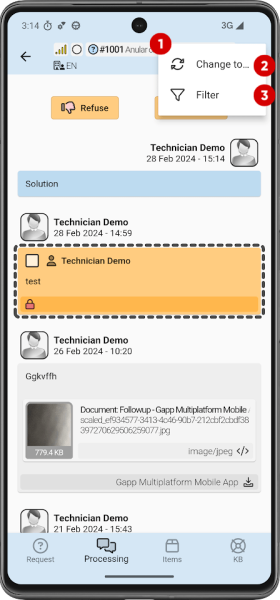
In Processing view, the toolbar displays another button (Filter) that allows you to show or hide conversation items.
- Ticket toolbar.
- Change status button.
- Filter button.
Ticket View – Processing – Filter
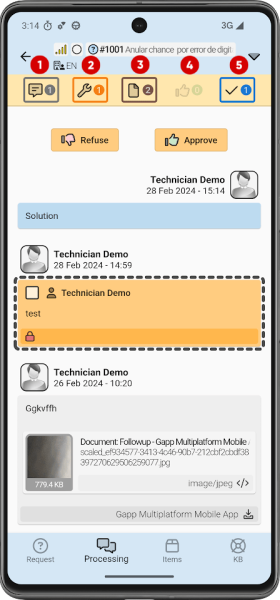
In the Processing view, the toolbar displays another button (Filter) that allows you to show or hide conversation items.
- Show/hide follow-ups.
- Show/hide tasks.
- Show/hide uploaded files.
- Show/hide validation requests and responses.
- Show/hide solution requests and responses.
Ticket View – Processing – Change Task Status
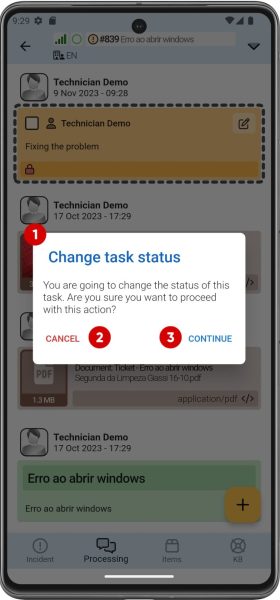
Tasks can be marked as done or not done. When changing its status, the following message is displayed to confirm the operation.
- Change task status popup.
- Cancel button.
- Confirm button.
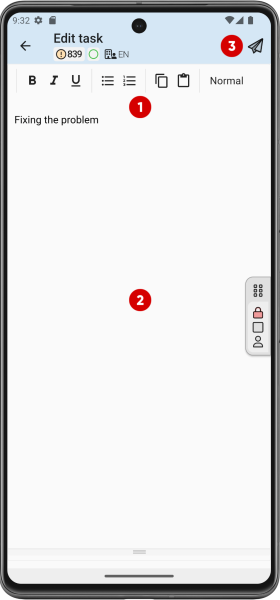
Ticket View – Processing – Edit task
Tasks can only be edited by their creator.
- Formatting options for task description.
- Description content.
- Update task.
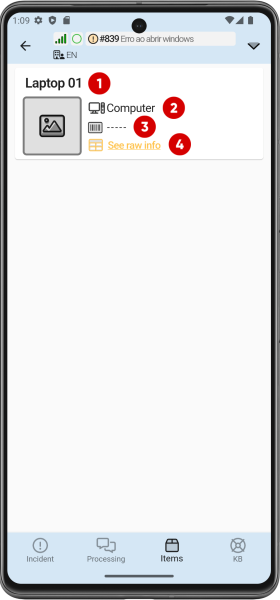
Ticket View – Items
Like in a full-fledged GLPI you can find all the items linked to a ticket.
- Item name.
- Item type.
- Item serial number.
- See raw info button.
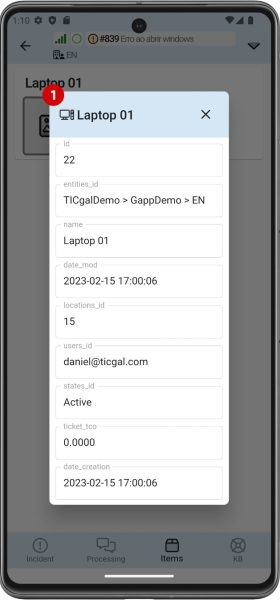
Ticket View – Items – Item Raw Info
From the list of items in the ticket view, the raw information of the item can be accessed by clicking on “See raw info” in the menu shown above.
- Item name.
- Item raw information:
- Item id.
- Entity id the item is stored in.
- Item name.
- Serial number.
- Last modification date.
- Ticket TCO.
- Creation date.
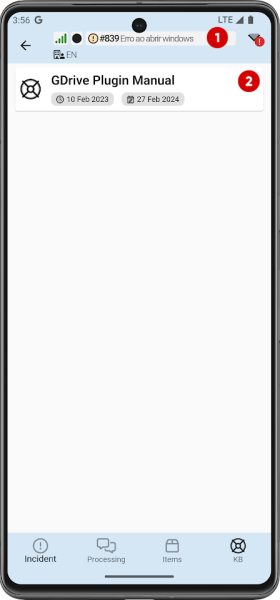
Ticket View – Knowledge Base – Linked Items List
The Knowledge Base (KB) view displays documents that may be useful to resolve the incident or request.
- Ticket info (type, ID, title…).
- Linked KB document.
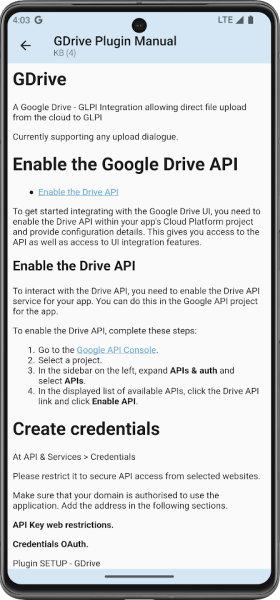
Ticket View – Knowledge Base – Item
Linked knowledge base items contain relevant information about the problem or a guide on how to fix it.
5. Ticket Actions.
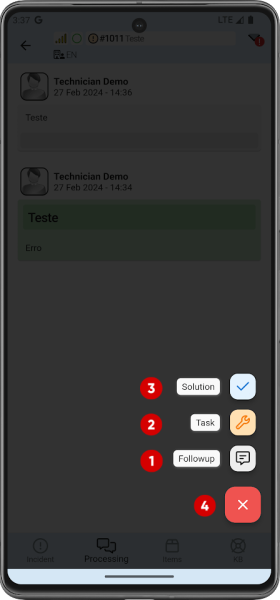
Ticket Actions
If you push the button in the bottom-right in Ticket Process view you will see.
- Add a new followup.
- Add a new task.
- Add a new solution.
- Close this menu.
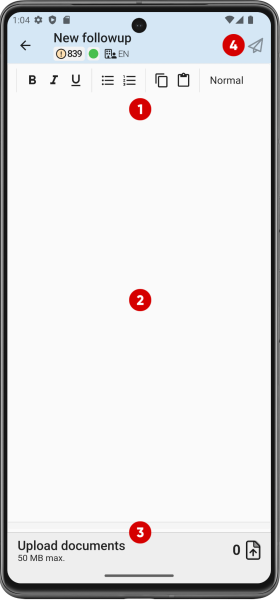
Ticket Actions – New Followup
- Formatting options for followup description.
- Followup content.
- Documents upload area. You can see a counter of uploaded documents. You can also upload photos directly from your smartphone camera in addition to your local files.
- Add followup.
Note: You can mention a user if you have the Gapp White Label version.
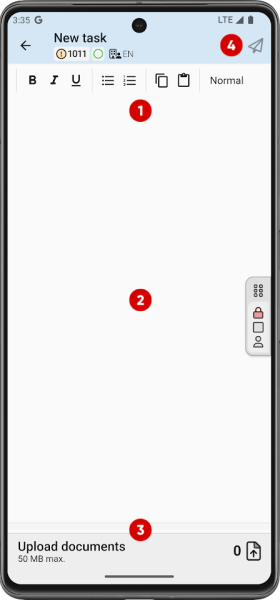
Ticket Actions – New Task
- Formatting options for task description.
- Task content.
- Documents upload area. You can see a counter of uploaded documents. You can also upload photos directly from your smartphone camera in addition to your local files.
- Add ticket task.
Note: You can mention a user if you have the Gapp White Label version.
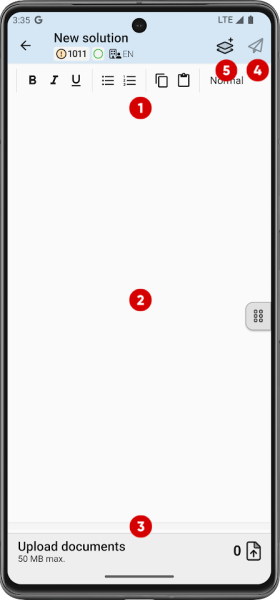
Ticket Actions – New Solution
- Formatting options for solution description.
- Solution content.
- Documents upload area. You can see a counter of uploaded documents. You can also upload photos directly from your smartphone camera in addition to your local files.
- Add ticket solution.
- Use a template.
Note: You can only mention a user or use solution templates if you have the Gapp White Label version.
6. New Ticket.
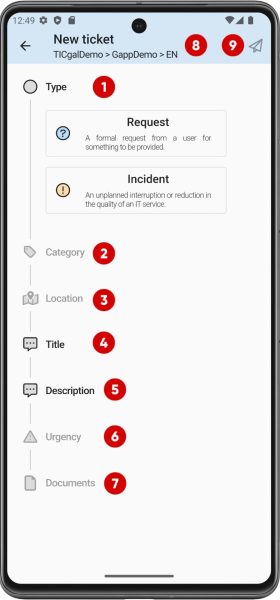
New Ticket Form
To create a new ticket, the application requests the following data:
- Ticket type. Request or Incident.
- Category of the ticket (optional).
- Location of the request/incident (optional).
- Title of the ticket.
- Description of the ticket.
- Urgency of the ticket.
- Document upload. You can choose either from your local files or take some photos with your phone’s camera (optional).
- The entity where you are creating the ticket.
- Add ticket button.
Note: You can assign a technician or group if you have the Gapp White Label version, and Gapp White Label allows making optional fields mandatory from the GLPI backend.
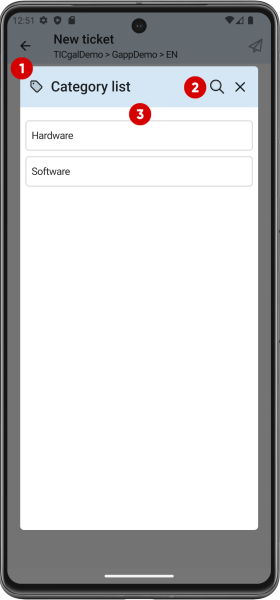
New Ticket Form – Categories & Locations List
Selectable categories are customizable and displayed in a list.
- Categories list popup.
- Search category button.
- Categories list.
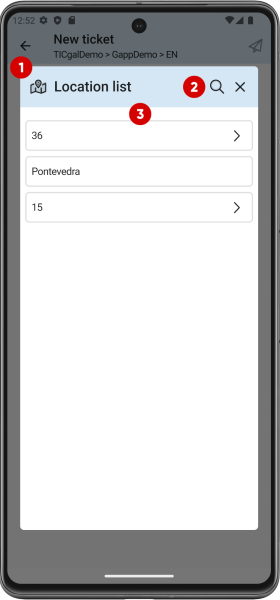
Selectable locations are also customizable and displayed in a list.
- Locations list popup.
- Search location button.
- Locations list.
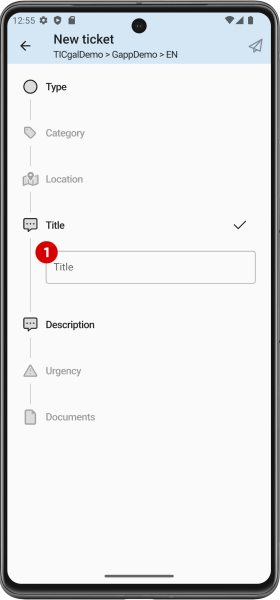
New Ticket Form – Title & Description
- Ticket title input.
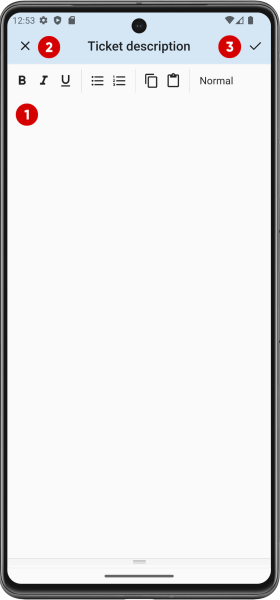
- Description content.
- Formatting options for ticket description.
- Add description.
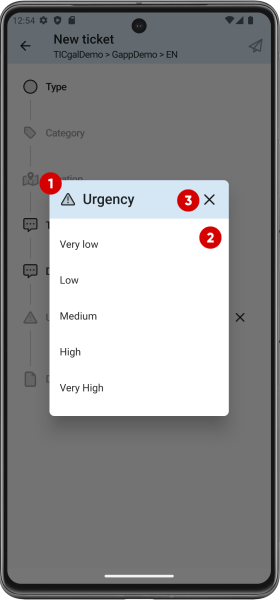
New Ticket Form – Urgency
By default, 5 urgency levels can be assigned to a ticket.
- Urgency list popup.
- Urgency options list.
- Close popup.
7. Ticket Approvals, Solutions & Satisfaction.
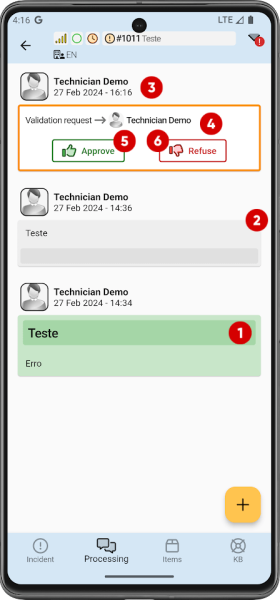
Ticket Validation Request
Before you approve or reject a validation, it will look like this in the processing view.
- Ticket content (title and description).
- Followup description.
- User requesting validation.
- User or group you are requesting the approval from.
- Approve button.
- Refuse button.
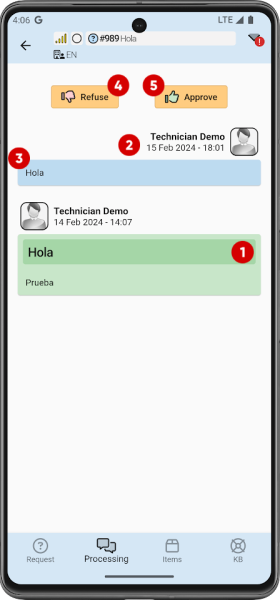
Ticket Solution
Before you approve or reject a solution, it will look like this in the processing view.
- Ticket content (title and description).
- Solution requester.
- Solution description.
- Refuse button.
- Approve button.
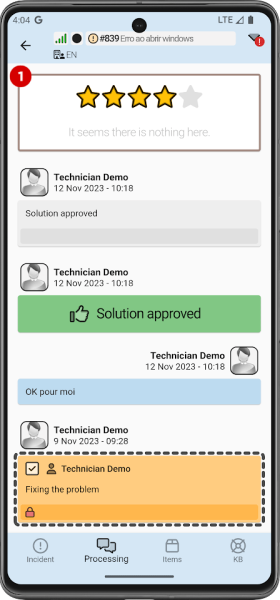
Ticket Satisfaction
When a solution is approved, this will pop up.
- Rating of the ticket solution (1 to 5 stars).

